Uplift documentation
Contents:
Uplift Introduction
Table of contents
Uplift Overview
Uplift is a dependency manager for Unity. It allows you to shift from importing your dependencies manually to declaring your dependencies and let Uplift do the work of managing your dependencies (and their own dependencies).
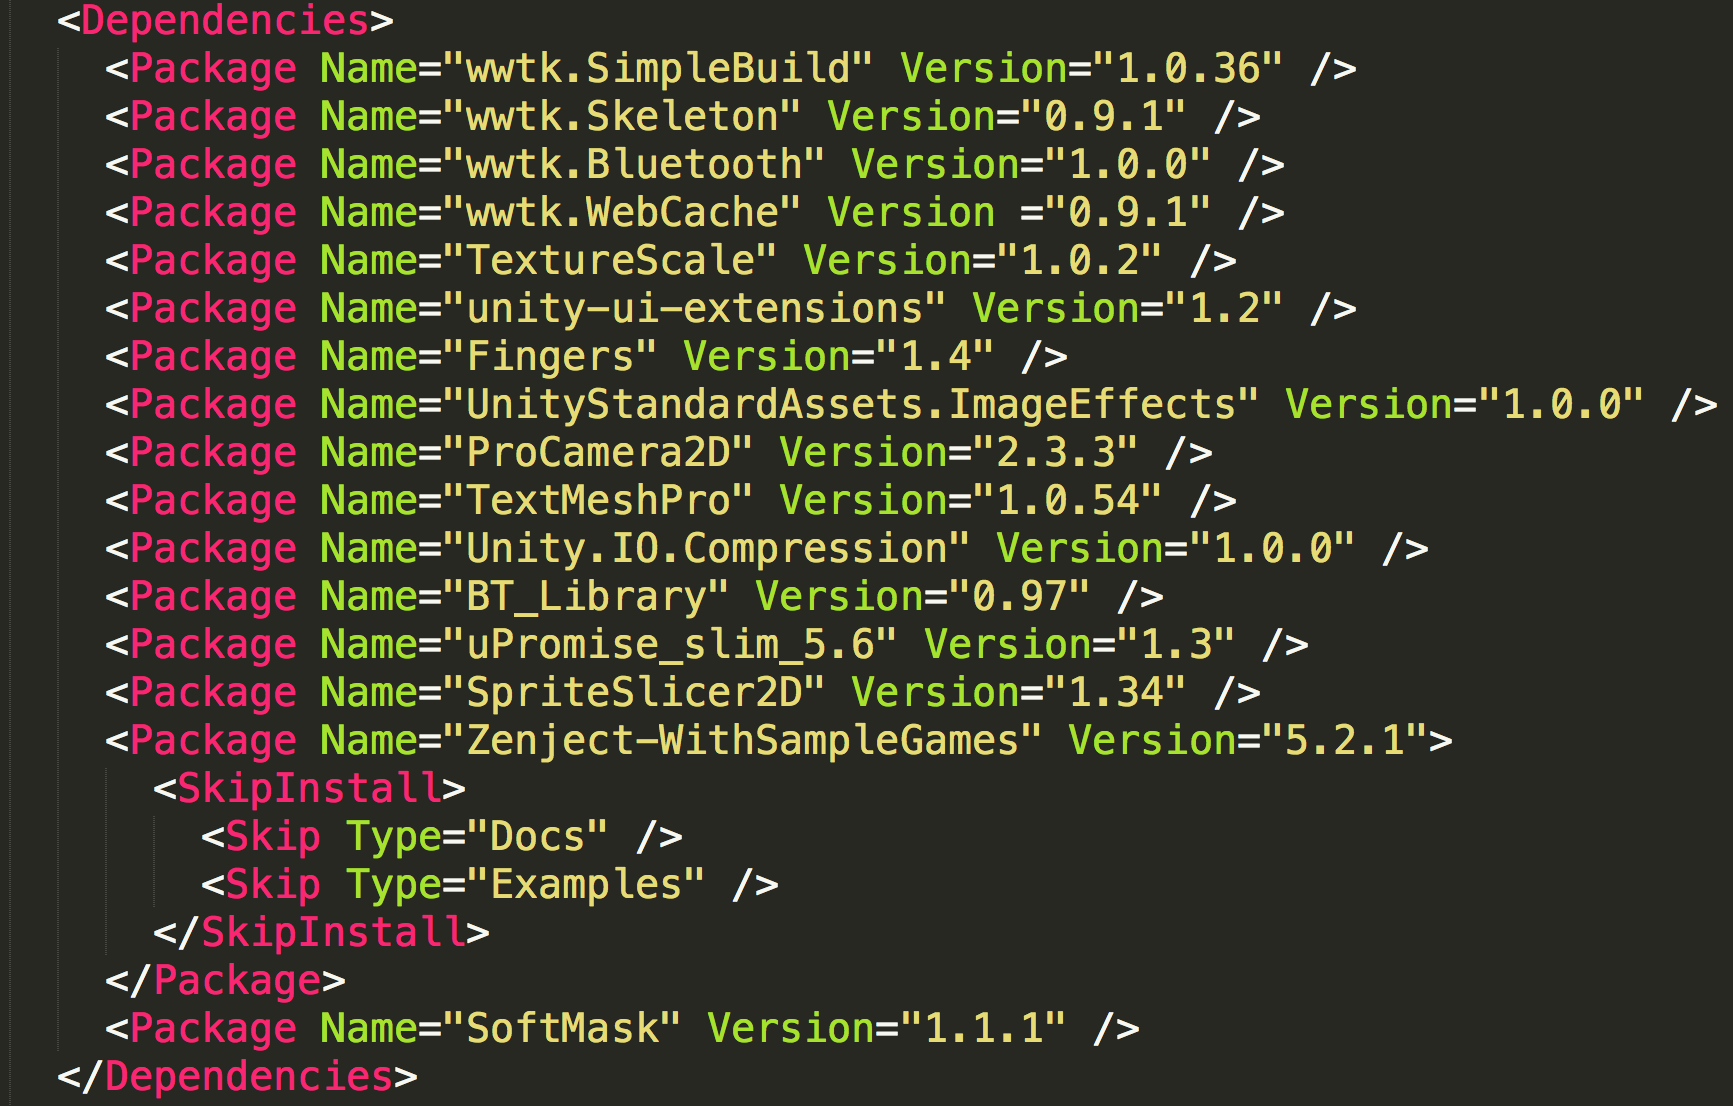
At the core of your project will lie a list of dependencies:
Letting Uplift Manage Your Dependencies
Before you go on, learn the rule #1 of letting Uplift be your Unity package manager.
In the world of software development, Unity is a bit special. Without package manager, assets are often shared in source format and imported into your project as is. This has several benefits like:
- it allows you to modify / fix an imported asset in place
- it allows you to let Unity upgrade APIs accross both your project and its imported dependencies
- it removes the need to prepare a per-platform compiled version of a package, in particular if your package makes uses of per platform defines, such as UNITY_ANDROID and the like.
But the fact that these quick operations exist go against the idea of clean module separations. It also can you make forget to fix the issues in a single place, inside your module, where these change belong.
A Paradigm Shift
When taking over the management of your dependencies, Uplift requires a little paradigm shift.
Here’s a rule that you should try to follow to make your life easier:
Code imported through Uplift shouldn’t be modified (by you or Unity) inside your project. A newer version of your dependency should be imported instead
(First rule of the book of Uplift)
As you see, this requires you to change your way of working a bit. But you will gain the ability to reuse packages properly accross multiple projects.
If you want to perform the aforementionned quick operations that Unity allows, Uplift might be in the way and you might break it. Don’t worry, if you version your code, you should be able to recover easily. And in the future, Uplift will contain features to detect and prevent you from doing things you shouldn’t be doing.
Basic Uplift Flow
To reiterate, here’s the basic Uplift flow:
- You add/modify your dependencies
- You ask uplift to install them. Uplift installs them and tracks the assets they contain (thanks to their GUIDs)
- You do not touch, move, erase the assets that Uplift installed
Good to go!
Uplift is there to lift you and your Unity Packages up. Learn how to use it. Learn to follow its flow.
If you understand that, you are now ready to learn more about Uplift and try Uplift on a project.
How Uplift Works
Uplift introduces 2 concepts:
- a concept of package, in effect a set of files, probably in a
.unitypackage, completed with meta information to describe the package contents and its dependencies (e.g. package name, version, etc) - a concept of repository, a place where to store your packages and expose them to Uplift
Note
we call the task of completing a package to ‘uplift’ it :)
Your Roles
When using Uplift, you will be having 2 main roles:
- a packager role, where you complete the external or internal unity packages and place them into Uplift repositories.
- a user role, where you use Uplift to install those packages into your project.
Note
As time go, your main role will be user. A package needs to be packaged only once and the task of packaging the packages will become more and more automated thanks to tooling.
Uplift and version control
Uplift has been designed with the objective of being used in projects that are on version control, and therefore we have a strong position on this subject. Our view on this is that your version control system should only contain things that are directly concerning your project and not its dependencies, which should only be referenced.
Here comes Unity
As you probably know, Unity requires you to have the source of your packages inside your project for you to be available to benefit from them. The downside of that is that they have to be filtered out from your project when you put in on version control, which can be tricky.
Filtering out installed files
Most version control solutions offer a way to filter out files from a project and we have been relying on this to be able to implement our design as we saw fit.
Note
At this time, we only directly support Git as version control but other adapters could be implemented if need be.
For Uplift to conflict as little as possible with your version control, we tried to be as
minimalistic as possible regarding the files that we filter out, so none of your own files would
mistakenly be missing from version control. The drawback of this is that we sometimes miss some
.meta files for some folders that you will have to manually filter out. This should be very
limited (our current project with ~30 dependencies had us manually ignore two files) and one-time
only.
Git users
For Git, we edit the .gitignore at the root of your project to be able to ignore installed
files. Note that we only edit our information only and nothing that you put in it will be overwritten.
For clarity purpose, we put a header and a footer around the lines that we write in the
.gitignore so that you know that there have been added by Uplift.
A .gitignore may look like this after installing some packages:
# == UPLIFT GITIGNORE START ==
# This section of the .gitignore has been created automatically by Uplift. Do not modify it or remove it.
/UPackages
/UPackages.meta
/Assets/UPackages/MyCoolPackage~2.4.11
/Assets/UPackages/MyCoolPackage~2.4.11.meta
/Assets/Plugins/AnotherPluginScript.cs
/Assets/Plugins/AnotherPluginScript.cs.meta
/Assets/Plugins/PluginScript.cs
/Assets/Plugins/PluginScript.cs.meta
/Assets/UPackages/AnotherAwesomePackage~3.0.6
/Assets/UPackages/AnotherAwesomePackage~3.0.6.meta
# == UPLIFT GITIGNORE END ==
Ensuring package consistancy with this?
The question that you may face when using source control in such a way is “How can I guarantee that all of my team work with the same packages if they’re not on version control?”. One of the features of Uplift has been thought precisely for this so you can be absolutly certain that there will be no issues on this side. This feature is the lockfile, which keeps track of your dependencies and what packages have been installed by Uplift.
Note
See also Lockfile overview (Upfile.lock)
This way, every time the project is launched, Uplift will install (if necessary) your dependencies exactly as they are described in your lockfile, ensuring that all of your team work with the exact same packages.
How To …
Table of contents
- Prepare a project for Uplift usage
- Kickstart a new project
- Use Uplift Menus
- Add a Repository To Your Project
- Add a Local Repository
- Add a Dependency
- Uplift packages
- Update Uplift
- Enable experimental features
- Work on two Projects Simultaneously
- Troubleshoot issues
- Make your package support multiple Unity versions
- Define your package version
- Find and Resolve GUID Issues
Prepare a project for Uplift usage
The following recommendations are very good to follow if you use Unity, even without Uplift. Not following them would make it impossible to use Uplift effectively.
Use version control.
Rationale: you don’t want to lose your code
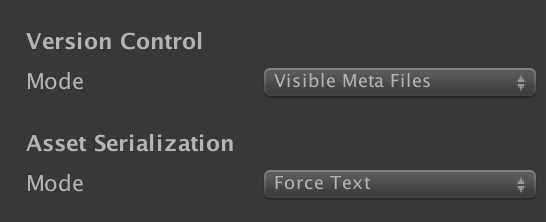
Configure your Editor to use Visible metas ( then Version Control set as Visible Meta Files).
Rationale: you would need them if you were working in a team. Uplift will need them to proceed with managing your dependencies, in particular because they contain GUIDs.
Configure your Editor to save assets in text mode ( then Asset Serialization set as Force Text).
Rationale: source controls will have a harder time dealing with binary blobs.
Result:
Kickstart a new project
You want to use Uplift’s power to add dependencies to your project? Adding Uplift to a new project is simple!
Make sure you have setup your Unity project according to these recommendations.
Add either source or compiled DLL in the
Assets/Plugins/Editor/directory in your project. Uplift currently depends onSharpCompress.dlland this dependency needs to be added as well in the same location. A unity package is available to ease the installation of both DLLs.After installation, Uplift is going to generate the
Upfile.xmlfor you in the project root [1].Once you’ve done this step you can add your first repository and start adding packages.
Finally, from Unity select then to see all fall into place.
You might want to see also:
- Working with modules guide, on how to work efficiently with modularized project
- Using binary (.dll) vs source code
| [1] | Upfile.xml is outside of Assets/ directory, which means it is not
visible in Unity 3D. Please open file manually in your favorite editor. |
Use Uplift Menus
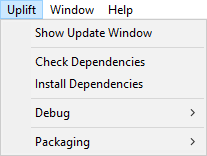
Show Update Window:
Displays a very simple Window showing information about each dependency and its install status, including potential updates.
Check Dependencies:
Checks and log in the console information about each dependency and its install status, including potential updates.
Install Dependencies:
Installs missing dependencies.
Debug:
Refresh Upfile:
Forces Uplift to refresh its Upfile.
Install from lockfile:
Installs dependencies exactly as they are stated in the lockfile.
Nuke All Packages:
Removes all assets installed by Uplift (and tracked in the Upbring file). Uplift makes sure to not delete a directory it created if you added a file into it.
Packaging:
Create Export Package Definition:
Creates an Asset under Assets/ for you to describe the package you want to export
Export Defined Packages:
Exports all of the packages described in your package definition assets.
Export Package:
Displays a very simple Window allowing you to create package definitions.
Add a Repository To Your Project
Open
Upfile.xmlOpen it in your favourite editor. Can’t find it? See Where is my Upfile.xml file?
Add repository inside
<Repositories></Repositories>tags.There are multiple Repositories Types available, refer to Supported Repositories Types which parameters are important for each and what the prerequisites are.
Example
Upfile.xmlwith a single FileRepository should look something like this:<Repositories> <FileRepository Path="Path/To/MyRepository" /> </Repositories>
In Unity select Uplift ‣ Refresh Upfile
No further actions are required. Enjoy your newly connected repository.
Add a Local Repository
If you want to test a package before releasing it, you can easily create a simple one package
repository on your filesystem and add a reference to it either in your local settings.xml or in
your project Upfile.xml by adding a File Repository line.
Note
See also: Declare local repositories
Note
See also: File Repository
Add a Dependency
Note: This guide assumes that the Dependency you want to add to your Project had already been prepared as an Uplift package. If that’s not true, you might have to uplift it yourself.
(Optional) Add repository at which package resides. See: Add a Repository To Your Project
In
<Dependencies></Dependencies>node add<Package />node with name and (optionally) version such as:<Dependencies> <Package Name="SomePackage" /> </Dependencies>
In Unity select
Requirements: dependencies need to contain meta files. When you install a dependency through Uplift, Uplift will make use of the asset GUIDs created by Unity. Those GUIDs are found in the .meta files. It is thus critical that all the assets found in your dependencies come with their meta files. See Prepare a project for Uplift usage to make the meta visibles and GUIDs in Unity for more information about unity GUIDs. If Uplift doesn’t find the asset’s meta, it won’t be able to track the asset and will stop at the dependency import.
Uplift packages
I.e. preparing Uplift packages.
Sometimes, you might want to pack existing .unitypackage package, so that it can be easily included in your project.
Note: Uplift only currently supports packages packed with Unity 5 or later.
Preparing an Uplift package is a 2 steps procedure:
- Create an
Upset.xmlfile - Put the properly packaged UPackage in the Repository.
As you noticed, the key phrase here is properly packaged, as every single Repository has their own type. For the sake of simplicty we’re going to assume File Repository.
Creating an Upset.xml is easy. As a minimal example:
<?xml version="1.0" encoding="utf-8"?>
<Upset xmlns:xsi="http://www.w3.org/2001/XMLSchema-instance" xmlns:xsd="http://www.w3.org/2001/XMLSchema">
  <UnityVersion>2017.1f3</UnityVersion>
  <PackageName>CoolPackage</PackageName>
  <PackageVersion>2.3.5</PackageVersion>
  <PackageLicense>MIT</PackageLicense>
</Upset>
- UnityVersion
- This is minimal version of Unity this package is going to work on. In case of doubt just use the version you’re preparing for.
- PackageName
- Name of your choosing. If you’re preparing an external package it’s best to use the same name as original package.
- PackageVersion
- Version of the package. If you’re preparing an external package it’s best to use the same version as original package. Uplift uses version numbers to decide for upgrades, so it’s best to increment them when necessary.
- PackageLicense
- This is very important, as it allows you to see the
licenses used in taken packages. If your
.unitypackagehad been taken from Unity Asset Store then most like it is UnityStoreLicense.
Upset.xml can define much more, namely, you can split your package by semantic type. Please see Upset for more information.
For the File Repository we expect the file structure to be such as
that, for every single .unitypackage we have .xml file with the
same basename, for example:
SomeCool.unitypackage
SomeCool.xml
VeryImportant~1.0.unitypackage
VeryImportant~1.0.xml
...
So once you have your .unitypackage package and Upset.xml file
ready, just put them in your File Repository (which, actually is only
a directory on your filesystem) and you’re good to go.
Recommendations
It is good to test your package before making it available to others. You might want to use a local repository to test it before placing it in a shared repository.
Another good practice is to follow the tips on how to maintain your module.
Update Uplift
Method of updating Uplift is dependent on how you have it installed.
If you have it installed as a binary package, just replace the old Uplift.dll with the new one,
restart Unity 3D and you’re good to go.
Warning
On Microsoft Windows systems you might not be able to update Uplift.dll in place. Shut down
Unity 3D before trying to do so in this case.
Warning
On OSX/Linux new DLL won’t take effect unless you restart Unity 3D.
If you have it installed as a source code, the best way to replace it is to remove Uplift source directory from the place, where you have installed, and then unpack new release to the same place.
You don’t have to restart. New version should start working right away.
Note
We will have auto-code update someday in future, so stay tuned!
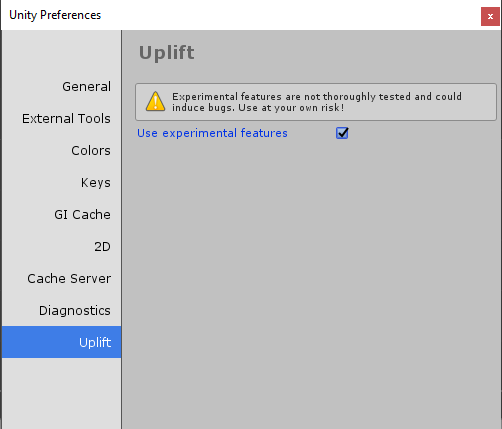
Enable experimental features
To enable experimental features, you need to go to the Unity Preferences menu.
To access it, you need to go to Edit > Preferences, and go to the “Uplift” tab in the window that appears.
You then need to tick the box “Use experimental features”.
Work on two Projects Simultaneously
When working with Uplift, one common scenario would be working with both a Module and a Project at the same time, as it’s much easier to see the result without separation.
As for time being, Uplift doesn’t support you with this out-of-the-box, but there are work-arounds.
Your first option is to use the Link feature of your file system:
- Link, using system features (See: How can I link file system for different projects?), your Module Project to a Game Project
- Upon changes in Module Project, Game Project should receive changes immediately
If you don’t, for whatever reason, want to link directories we recommend
- Isolate package you want to have in separate Unity project (Module Project)
- Run 2 instances of Unity - one on Project and one on Module (See: How to run multiple instances of Unity?)
- Copy files manually between Module and Project (by any means you want: copy, git, Makefile, or any tool you enjoy using)
Once you are done making your changes in your 2 projects
- revert the changes you made in your project (e.g. remove the links or locally modified files)
- prepare and publish your updated package to your repository (don’t forget to bump the version number and to consider testing it in a local repository first before sharing it with others)
- change your Uplift configuration if needed (e.g. change the version number of your repository)
- tell Uplift to fetch and install the newer dependency.
Troubleshoot issues
If something is wrong:
Restart Unity
A simple restart might fix odd caching issues. It is also required if you have just update Uplift. Remember to save your work first, though!
Check if you’re using latest Uplift
We improve and squash bugs every day. Maybe the problem you encountered is already solved? (See Update Uplift if you need help with updating)
Look at Unity console
When designing Uplift we took extra care to provide you with informative feedback about the state you’re currently in. The answer might lie just in front of you.
Check documentation
Have you tried looking for your problem in this documentation? There are some constraints and caveats we are aware of, it might be that you’ve encountered one of them.
Take a look at the
Upfile.lockUpfile.lockkeeps track of the state of the dependencies of your project. It might provide you with insight required for solving the issue you’ve encountered. Maybe some package is pulling the wrong dependency?See also Lockfile overview (Upfile.lock)
Check
Upbring.xmlThe
Upring.xmlis a special file, in which we remember which file belong to which package. It is possible that by some random occurrence, or simple mistake, something went awry and we can’t fix it.Sometimes removing the line corresponding to an error might fix the issue. Sometimes you’ll have to manually edit that file. Sometimes you might need to remove files that Uplift has let laying around in your project.
See also Upbring overview
Nuke and re-install
Truly nuclear option. By nuking, you’re asking Uplift to try removing everything that Uplift it has created for you. Removing everything and re-installing everything might solve everything, but won’t help anyone in the long run, so use it as a last resort only
Extra step: File a ticket
If you encounter any illogical or erroneous behavior make sure to let us know. We’ll either fix it, help you or document it for future generations.
Make your package support multiple Unity versions
From the package perspective, the information provided by the user is the UnityVersion element found under Upset overview. This element is mostly for information purpose. As for now, there are no strict guidelines as for which Unity versions are supported by a package and which are not. This means that Uplift will not fail if you try to import a package not supported by it.
The .unitypackage generated from Unity 4, are, however not supported at all.
If you want your package to work with multiple Unity versions you can either:
Make sure that your package works for every version you want to support (and provide minimal requirement in Upset overview). Use Unity Preprocessor Directives whenever needed.
Provide multiple versions for different Unity versions, for example: -
MyPackagesupports Unity 5+ -MyPackage_5.6supports Unity 5.6+ -MyPackage_2017supports Unity 2017.1+This is obviously not a long term solution and we are investigating adding multiple unity version support into the repositories (tracked internally as UP-111).
Note
At some point we might enforce specific Unity versions, this will be noted both in release notes and Uplift itself.
Define your package version
Uplift recommends that you follow the syntax defined by Semantic Versioning 2.0.
We strongly encourage you to read the information on this website as it proposes a good standard for versioning in software engineering.
To summarize the idea is to have your version follow this pattern X.Y.Z, with:
Xbeing the MAJOR version of your package, when you make incompatible API changes.Ybeing the MINOR version of your package, when you add functionality in a backwards-compatible manner.Xbeing the PATCH version of your package, when you make backwards-compatible bug fixes.
Find and Resolve GUID Issues
For various reasons, you might end up having GUID issues in your project while using Uplift. Let’s see some of these scenarios.
Why are GUIDs fragile?
If you don’t track GUIDs, or lose them, Unity will generate a new one and most probably it will generate a different ID for the same asset.
Another breakage can happen if you reuse an asset to do something else.
Let’s say you installed a module that came with some examples. You decided you didn’t need the examples but prefered to create a feature out of them. After all they might be almost what you need!
To get started you moved out the Examples files into a different area, and started modifying the examples to do what you do.
Wrong!
Both Unity and Uplift expects a GUID to be attached to a specific asset. Your new asset is still seen conceptually as the original example code.
If you upgrade your package using Unity, it will try to get the newer version of the Example asset onto your working code. If you ask Uplift to nuke or upgrade you asset, the same conflict will happen.
How to detect and correct issues?
If something unexpected happens with GUIDs, Uplift will detect issues and propose solutions.
For example before importing dependencies, it checks for potential GUID duplicates and stops the import process right away. Note while Uplift does its best to not install a dependency with conflicting GUIDs, a GUID conflict currently can be discovered in the middle of installing multiple dependencies. In this case, follow Uplift instructions (remove the offending duplicates), before running the Install process again.
When trying to nuke a package, it tries to delete all the file it contained. If for some reason you already have deleted the file, or changed its GUID, Uplift will complain and log in the console. You might have to do some manual cleanup. As always, you shouldn’t modify files that Uplift has imported Letting Uplift Manage Your Dependencies.
Not sure what to do?
Currently, the easiest way to fix GUID issues is to Nuke and Reinstall all your dependencies. This might take a bit of time though. Of course, you’d better make sure your project is properly under version control.
Recommendations …
Table of contents
Working with modules
If your module has dependencies, you will end up with both an Upfile.xml and an Upset.xml in your project. Both contain a bit of similar information: the list of your dependencies.
There’s one difference though: in your Upfile you might have other dependencies, maybe internal dependencies that you don’t want to share to the world or only use during development.
Upfile.xml
<Dependencies>
    <!-- dev dependencies -->
    <Package Name="my.cool.dev.tool" Version="1.*" />
    <!-- runtime dependencies -->
    <Package Name="JsonDotNet" Version="1.3.*" />
</Dependencies>
Upset.xml
<Dependencies>
    <!-- runtime dependencies -->
    <Package Name="JsonDotNet" Version="1.3.*" />
</Dependencies>
Maintaining modules
Altough a bit out of scope of Uplift itself, here are some tips to follow when maintaining your modules. This is important as you will be making them available through Uplift:
Module layout
Consistency is important here and we will be adding proper guidelines for module layout and maybe let Uplift help you either generate or check your module layout. In the mean time here are a few tips.
Don’t forget that someone might use your package outside of Uplift, so making sure you do not have file or directory conflicts is still important.
So until everyone uses Uplift, make sure to move your files under a directory that will not clash with someone else’s project.
API stability
Namespaces are important. Use them!
Keeping some backward compatibility is also important. Your users. If everyone was following similar versioning rules it would make the task of defining your dependencies and their versions easier.
Be careful with GUIDs. They are to be treated as part of your API. I.e. Don’t modify an asset to be something completely different. E.g. if you rename a file and change its content (whether code or media) to be something completely incompatible, it will cause problems for its users.
Versioning of your modules
Contents / size of your module
Here no specific recommendations regarding size. Sometimes you will have a very small module (e.g. a few assets), sometimes very large. It all depends on the granularity of it.
If your module contains some DLLs, consider moving them out in their own packages and making them dependencies.
Dependencies of your modules
Which dependencies to list: only list direct dependencies. If your module doesn’t directly depend on a dependency, and only its modules do, do not add it to the list of dependencies.
If your dependency changes and extract a module out of it so that a direct dependency isn’t needed anymore, do not forget to revise your dependency list.
Which version requirement to use: Uplift supports various types of version requirements. You sometimes need a fixed version (“1.2.3!”) to ensure you use a particular version. This means you won’t be able to change it. This could cause conflicts if another dependency needs a different version. So be careful when selecting it.
Most of the time you will prefer a more flexible requirement so that uplift will be able to resolve the proper dependencies based on all those available. In this case you might opt for a:
- lose requirement (“1.2”)
- minimal requirement (“1.2+”)
- bounded requirement (“1.2.*”)
If the module you depend upon follow Semantic Versioning, then you can most probably use a version range similar to “major.*”.
For more details about versioning, see Version Requirements
Futher reading
- https://unity3d.com/asset-store/sell-assets/submission-guidelines, in particular section 3
- https://docs.microsoft.com/en-us/dotnet/standard/design-guidelines/index
- https://www.youtube.com/watch?v=heh4OeB9A-c “How To Design A Good API and Why it Matters”
Switching from source codes scripts to DLL
Using DLLs into Unity: Pros & Cons
There are major differences between using source code and DLLs for your project, so here is a quick rundown (not exhaustive) of the pros and cons to using DLLs inside Unity:
Pros:
- Tidiness: When using DLLs, you will not have hundreds of scripts laying around and cluttering your project. You could have a single
Modulesfolder with all of your DLLs inside it. - Reusability: Creating DLLs may be one of the best ways to ensure that your code isn’t necessarily tied to your project and is reusable in other projects as well, which could speed up your future projects by quite a lot.
- Code Redistributing: Using DLLs as a package creator offers some major advantages:
- when releasing an update to a .unitypackage, if you deleted some scripts between the different releases, the users of the package will have to manually delete them. If they’re packed into a DLL, the DLL will get updated and the user won’t have to do a thing.
- they can hide in a very basic way your code if you do not want to make it public. Because DLLs are precompiled, users will not have a direct access to your source code and they will neither be able to mess with it or take a look at it. Do not that in most cases, it will not keep motivated users from having access to the code, thanks to the many decompiling tools available.
Cons:
- Interoperability: DLLs require a lot of care when using them on different platforms, and you may encounter errors you wouldn’t when using source code. Moreover, you do not have access to Unity’s conditional compilation (
#if UNITY_EDITOR…), which could limit the flexibility of your plugin. Because you do not have access to the directives you may have to do platform-specific DLL compilation. For instance to make up for the fact that you do not have access to#if ANDROIDyou may have to compile a generic DLL and an Android-specific DLL. - Harder debugging
- Security issues: DLLs could be replaced with ill-purposed ones by potential hackers.
- [ALLEGED] Performance issues: I have read at multiple occasions that using DLLs instead of source code could have a small but noticeable performance impact on your project.
How to switch between one another
NOTE: The following assumes that you have all your .asset files serialized as text files and not as binaries. To do so you can open the Editor Settings window, by going into the menu and select the Mode in Asset Serialization to Force Text.
If you decide that you want to switch between source code and DLLs for some reason, you need to do it very carefully. The main issue that you will encounter are GUIDs. Unity uses them to reference all kinds of Assets in prefabs, scenes or GameObjects. If you want to precompile MonoBehaviours, then all GUIDs will be modified, breaking the prefabs, scenes and GameObjects using it. Let’s take a look at a precise example: if you have an ScriptableObject using a MonoBehaviour with guid 1a1578b9753d2604f98d608cb4239e2, and the script is not in a DLL yet then you will see in you myscriptableobject.asset file:
MonoBehaviour:
    m_ObjectHideFlags: 0
    m_PrefabParentObject: {fileID: 0}
    m_PrefabInternal: {fileID: 0}
    m_GameObject: {fileID: 0}
    m_Enabled: 1
    m_EditorHideFlags: 0
    m_Script: {fileID: 11500000, guid: 1a1578b9753d2604f98d608cb4239e2, type: 3}
    m_Name: Some Name
    m_EditorClassIdentifier:
    hashCode: -1290730340
You can see that there is a direct reference to the guid of the script you are using. If you then compile this MonoBehaviour into a DLL, your asset file will not change, still referencing the object with GUID 1a1578b9753d2604f98d608cb4239e2, which no longer exists, breaking your ScriptableObject.
You could fix this by going to your asset inspector, which will indicate that there is a missing script, and selecting the script from inside the DLL. But this would break all the parameters used by your script as Unity believes that you are using a totally different script and will remove every serialized parameters in your asset, so you would have to re-enter everything by hand. The simplest way to correct the referencing would be to edit the m_Script: {fileID: 11500000, guid: 1a1578b9753d2604f98d608cb4239e2, type: 3} line to point towards the new location of the script.
The correct values that you will be using will be:
- guid: you will have to replace the guid of the script by the guid of the DLL. This alone will not solve your issue, as it only points towards the DLL wich is not enough.
- fileID: the fileID is the way that DLLs keep track of the scripts that are inside them. To find the fileID value of your script you can do it
- manually by adding your MonoBehaviour to a dummy GameObject, saving said GameObject and copy the line with
m_Script: {fileID: somefileID, guid: guidofthedll, type: 3}to replace all the references to the MonoBehaviour with that. - programmatically as someone reverse-engineered the way that the fileID is generated by Unity: forum link, which you could use to automatize the replacement of the references.
- manually by adding your MonoBehaviour to a dummy GameObject, saving said GameObject and copy the line with
In my previous example, the only line I had to replace in my files was the m_Script and the assets looked like this after it:
MonoBehaviour:
    m_ObjectHideFlags: 0
    m_PrefabParentObject: {fileID: 0}
    m_PrefabInternal: {fileID: 0}
    m_GameObject: {fileID: 0}
    m_Enabled: 1
    m_EditorHideFlags: 0
    m_Script: {fileID: -667331979, guid: 89f0137620f6af44b9ba852b4190e64e, type: 3}
    m_Name: Some Name
    m_EditorClassIdentifier:
    hashCode: -1290730340
And the asset was working as intended.
Frequently Asked Questions
Where is my Upfile.xml file?
Upfile.xml is located in the root of your Project. Note, that, as
it isn’t located under Assets/ directory, you won’t be able to see
it in Unity.
What is this Upfile.lock file?
If you install packages with Uplift you will probably notice that it generates a file called
Upfile.lock at the root of your project. This file is quite important as it allows you to easily
work in a team and have as few dependency conflicts as possible. See Lockfile overview (Upfile.lock) for more
information.
Where is my settings.xml file?
Your settings.xml file is located in a directory .uplift under your Home directory (that is
the directory pointed to by the HOME environment variable).
Why can’t Uplift use out of box unity packages?
Standard unitypackages need to be completed with an Upset file in order for Uplift to work with them. Uplift needs extra information such as name, version, license, dependencies, license to do its work. See Upset overview for more information about the Upset file.
How to run multiple instances of Unity?
We recommend using command line u3d, which is awesome [1]. You can also run second instance
by running Unity once again, and then select different project to run. For this to work, however,
you need to have unchecked
Why can’t I reuse code that Uplift Installed?
How can I link file system for different projects?
For Linux/OSX you can use symbolic links. It’s easily done from console using ln -s TARGET SOURCE.
For Windows, symbolic links are available as well (for NTFS filesystems), however they require admin access.
Command, from cmd.exe to create it is mklink /D SOURCE TARGET.
In case, when admin access is not possible or desired, one can try to use Junction feature instead with command
mklink /J SOURCE TARGET.
Why are the meta files for the folders different than the original package?
If you create your own package, you may realize that the meta files for the package folders are different after being imported with Uplift.
This behavior is originating from Unity itself! If you try importing a .unitypackage manually you will notice similar differences.
Should I worry about that?
Fortunately you shouldn’t: the meta files for folders are currently mostly irrelevant and them being modified will have a minimal impact on your project. If they become relevant at some point, Unity will probably make sure that this behavior is modified and you will not have an issue in that case!
| [1] | u3d is a tool that we use that helps with: maintaining multiple unity version,
automate installation and runs the proper Unity instance for your project |
Uplift files
Table of contents
Upfile overview
The Upfile is maybe the most important file in your project as it describes exactly how Uplift will behave. As a package user this will be the only file you will have to deal with.
Note
As Uplift is useless when the Upfile is not present, this file will be created automatically every time your project is loaded if it is not present.
Therefore, after adding Uplift to your project for the first time, it will create a Upfile.xml file at the root of your project. Removing this file is strongly discouraged as it will be created anew every time your project is loaded.
This is what the your Upfile may look like upon creation:
<Upfile>
    <UnityVersion>5.6.1f1</UnityVersion>
    <!-- SAMPLE REPOSITORIES BLOCK

    <Repositories>
        <FileRepository Path="Path/To/Some/File/Repository" />
    </Repositories>

    -->
    <Repositories>

    </Repositories>
    <Configuration>
        <!--
            Important note:

            We're not tracing Location settings for anything unpacked outside of Assets.
            This means, that if you change those in settings while already
            having packages/other stuff installed then you need to cleanup
            previous locations manually at your own discretion.
        -->
        <!--
            Path Flags:

            SkipPackageStructure (true|false):
            Don't create package subdirectories
            (in form of PackageName~1.0.0)
        -->
        <!--
            Repository configuration part.

            Most often, files here shouldn't be visible by your project.
            i.e. should be put out of the Assets/ path in your project.
        -->
        <!-- Path where downloaded, raw, packages are unpacked        -->
        <RepositoryPath Location="UPackages" />
        <!-- Path where documentation are unpacked                    -->
        <DocsPath Location="UPackages/Docs" />
        <!-- Path where examples are unpacked                         -->
        <ExamplesPath Location="UPackages/Examples" />
        <!--
            Project configuration part.

            Paths set here most often should be visible by your project,
            i.e.be in Assets path.
        -->
        <!-- Path where "usable" files are unpacked                   -->
        <BaseInstallPath Location="Assets/UPackages" />
        <!-- Path where media  files are unpacked                     -->
        <MediaPath Location="Assets/UPackages" />
        <!-- Path where plugin files are unpacked                     -->
        <PluginPath Location="Assets/Plugins" />
        <!-- Path where editor plugin files are unpacked              -->
        <EditorPluginPath Location="Assets/Editor/Plugins" />
        <!-- Path where gizmos are unpacked                           -->
        <GizmoPath Location="Assets/Gizmos" />
    </Configuration>
    <Dependencies>

    </Dependencies>
    <!-- SAMPLE DEPENDENCIES BLOCK

    <Dependencies>
        <Package Name="SomePackage" Repository="Optional.Repository" Version="Optional.Version.Spec" />
        <Package Name="PackageB" />
    </Dependencies>

    -->
</Upfile>
As described in this sample file the Upfile has four sections that you will want to look at.
UnityVersion
<UnityVersion>some version</UnityVersion>
This section describe which Unity version was the Upfile created for.
Repositories
<Repositories>
    <!-- Your repositories go here -->
</Repositories>
This section is where you describe the repositories where Uplift will fetch the packages from. This is probably the first logical step that you will want to take when integrating Uplift into your project.
Note
See also Supported Repositories Types
Configuration
<Configuration>
    <!-- Your configuration go here -->
</Configuration>
This section will let you specify how Uplift should import your dependencies, more precisely where it should put the different parts of a package in your project. For example, if you wanted to put the documentation of the packages outside of Assets and into a folder called Documentation you could do something like that:
<DocsPath Location="Documentation" />
Note
See also Configuration types
Dependencies
<Dependencies>
    <!-- Your dependencies go here -->
</Dependencies>
This is where you describe what are the dependencies of your project. Every time you want to add a dependency to a package you can add a Package node to this section. For example, if I want to add a dependency on the version 2.1.3 of a package called MyPackages.MyLogger, I would add:
<Package Name="MyPackages.MyLogger" Version="2.1.3" />
Note
See also Version Requirements See also Paths In Uplift Are Cross-Platform
Upset overview
The Upset file is the main package will have to deal with if you are a package creator/maintainer.
It will complete the actual package it comes with.
A very basic Upset.xml file could look like this:
<Upset>
        <UnityVersion>5.6</UnityVersion>
        <PackageName>MyPackages.SomePackage</PackageName>
        <PackageVersion>1.0.6</PackageVersion>
        <PackageLicense>Free</PackageLicense>
</Upset>
As illustrated in this example, there are four important sections to the Upset.
UnityVersion
<UnityVersion>some version</UnityVersion>
This section describe which Unity version was the package created for. When Unity changes its major version (5 to 2017 for example) API change, .NET version change and your package may or may not support older/newer versions of Unity.
PackageName
<PackageName>name of you package</PackageName>
This is absolutly mandatory as Uplift relies heavily on this piece of information.
PackageVersion
<PackageVersion>version of you package</PackageVersion>
This section defines the version of the package. This should not be overlooked! If you follow SemVer, the package version will carry more information than the package name.
Note
See also Define your package version
PackageLicense
<PackageLicense>license of you package</PackageLicense>
This section describes under what license you are releasing your package. This is quite an important piece of information as well if you release it publicly as package users will need this information to know how they can use it.
Upbring overview
The Upbring file, which you can find under UPackages/ is the memory of Uplift. For each file
installed in your project, there will be a reference to it inside the Upbring.xml.
Warning
The Upbring is a file that is critical to the correct behaviour of Uplift. It is handled automatically and you should not mess with it. Any modification that you make will compromise Uplift’s ability to act correctly.
This is what the your Upbring may look like after installing two packages:
<?xml version="1.0" encoding="utf-8"?>
<Upbring xmlns:xsi="http://www.w3.org/2001/XMLSchema-instance" xmlns:xsd="http://www.w3.org/2001/XMLSchema">
        <InstalledPackage Name="MyCoolPackage" Version="1.0.7">
                <Install xsi:type="InstallSpecPath" Type="Root" Path="UPackages/MyCoolPackage~1.0.7" />
                <Install xsi:type="InstallSpecGUID" Type="Base" Guid="8224315dc16a34a45923e7c0caab396b" />
                <Install xsi:type="InstallSpecGUID" Type="Base" Guid="ae6f65ea11f3972458317a9cd2632618" />
                <Install xsi:type="InstallSpecGUID" Type="Base" Guid="fa060bfa4026c534795d82e0a30a7b38" />
        </InstalledPackage>
        <InstalledPackage Name="AnotherAwesomePackage" Version="4.8.0">
                <Install xsi:type="InstallSpecPath" Type="Root" Path="UPackages/AnotherAwesomePackage~4.8.0" />
                <Install xsi:type="InstallSpecPath" Type="Base" Path="Assets/UPackages/AnotherAwesomePackage~4.8.0/Script.AnotherAwesomePackage.cs" />
                <Install xsi:type="InstallSpecPath" Type="Base" Path="Assets/UPackages/AnotherAwesomePackage~4.8.0/Upset.xml" />
        </InstalledPackage>
</Upbring>
As you can see, this is quite straight-forward. Each installed package has a node
InstalledPackage with a children node for every file contained in it. The only thing that could
be problematic is the xsi:type="InstallSpecXXX", which is only the way we track the file.
InstallSpecPath
The easiest way to understand how we track installed files is to look at the case when we do it by path. In the previous example, you can see lines such as :
<Install xsi:type="InstallSpecPath" Type="Base" Path="Assets/UPackages/AnotherAwesomePackage~4.8.0/Script.AnotherAwesomePackage.cs" />
This means that there is a file at Assets/UPackages/AnotherAwesomePackage~4.8.0/Script.AnotherAwesomePackage.cs
that we currently track.
Warning
This is the reason why we recommend that you do not move any file installed by Uplift. The path would not be updated and we would simply lose track of said file.
Note
See also Paths In Uplift Are Cross-Platform
InstallSpecGUID
Whenever possible, Uplift will try to track an asset by its guid rather than by its path. There are a few conditions that need to be met so this service can be offered:
- The file must be installed under
Assets/(not directly, it can beAssets/Folder/...) - There must be a .meta file inside alongside the file in the original package
Note
See also GUIDs in Unity
What is the Type attribute about?
This attribute only tells which kind of file has been installed.
Note
See also Configuration types
Lockfile overview (Upfile.lock)
The lockfile, called Upfile.lock is a file generated automatically at the root of your project
whenever you install dependencies.
Its main role is to keep track of the state of the dependencies of your project at any time in your project life cycle. It does so in a way that is readable by a human being so you can easily understand what is going on.
Note
The lockfile is generated right after the dependency tree is solved, and just before the actual installation of the packages.
A standard lockfile could look like this:
# UPFILE DEPENDENCIES
MyLoggerPackage (1.*)
MyBluetoothPackage (2.1.7+)
MySaveSystemPackage (1.2.6!)

# SOLVED DEPENDENCIES
MyLoggerPackage (1.4.2)
    MySerializationPackage (1.0.0+)
MyBluetoothPackage (2.1.9)
MySaveSystemPackage (1.2.6)
    MySerializationPackage (1.8.7+)
MySerializationPackage (1.9.3)
As you can see in this example, there are two sections in the Upfile.lock:
UPFILE DEPENDENCIES
This section keeps track of the direct dependencies of your project, ie the one that you define in
your Upfile.xml. The name of the dependency and the version requirement.
SOLVED DEPENDENCIES
This section describe how Uplift performed the dependency resolution and what was its result. For each package of your dependency it will record, which version of the package it chose, and what are the dependencies of this package. It will do this for your direct dependencies as well as their transitive dependencies, ie the dependencies of your dependencies.
See also Upfile overview See also Version Requirements
A word on the lockfile
The format for the lockfile is heavily inspired by Bundler. The advantage of such a decision is to make dependency resolution and dependency usage overall as simple as possible.
Install replication
A lockfile allows you to make sure that you work in a stable environment: you can solve your dependencies once and then work with them even if some newer version are released, making using external dependencies even simpler and more secure.
Furthermore, if you setup some continuous integration on your project, you want to be exactly sure
of what your CI server is going to install so you can be absolutly sure of what your build will have
installed. A lockfile is ideal for this as you can generate it when working on your project and ask
your CI server to install only the dependencies as described in the lockfile. You can do so by
calling Uplift.Common.Cli.InstallLockfile() for instance.
Readability
The lockfile records the state of your dependencies in a readable fashion so it can be understood without any kind of issue. It allows for easy troubleshooting your project and fully grasp what is installed and why.
Clean source-control
If you update a dependency, the way that the lockfile is structured will provide a really easily understandable difference. For instance, in Git:
diff --git a/Upfile.lock b/Upfile.lock
index af7a2aa..66a11dc 100644
--- a/Upfile.lock
+++ b/Upfile.lock
@@ -8,7 +8,7 @@ MyBluetoothPackage (2.1.7+)
MySaveSystemPackage (1.2.6!)

# SOLVED DEPENDENCIES
-MyLoggerPackage (1.4.2)
+MyLoggerPackage (1.4.3)
Version Requirements
When specifying a dependency, you can specify its version thanks to the following syntax
- fixed requirement (“1.2.3!”). Only that version.
- minimal requirement (“1.2+”). 1.2 and onwards. Accepts 1.3, 2.0, etc
- lose requirement (“1.2”). 1.2 <= v < 1.3.
- bounded requirement (“1.2.*”). 1.2 < v < 1.3.
Local settings file overview (.uplift/settings.xml)
In your $HOME directory, Uplift uses a directory .uplift to store various things, and notably
your local settings to use accross all of your projects. As of Uplift v1.0.0beta4, there are two
main uses to your local settings file, which will be presented here.
The default location for the settings file is $HOME/.uplift/settings.xml, for example:
- On OSX:
/Users/jlacoste/.uplift/settings.xml - On Linux:
/home/pkaminski/.uplift/settings.xml - On Windows:
C:\Users\pniezborala\.uplift\settings.xml
Sample settings.xml looks as follows:
<UpliftSettings>
    <Repositories>
        <!-- Some Repositories -->
    </Repositories>
    <AuthenticationMethods>
        <!-- Some authentication -->
    </AuthenticationMethods>
</UpliftSettings>
Declare local repositories
If you want to declare repositories that you can use accross all of your projects on your machine
here is the place! You can add Repositories here as you would in your Upfile.xml.
Note
See also Add a Repository To Your Project
This is especially useful with File Repositories (see File Repository) as it enables you to have machine-specific repositories without having to rely on relative paths.
Such specified repositories will be used as any other Repository in your Upfile.xml.
Declare authentication methods
If you need authentication in some of your repositories (i.e. they are private repositories), you will have to specify your credentials, some token or something. Those are supposed to be private, and should not be hard coded in your projects.
The AuthenticationMethods of the settings.xml allows you to do precisely this. It stores
your credentials for your repositories and uses them to access your repositories.
Warning
For now, the only supported repository that could use credentials is the ../repository/github_repository. The easiest way to authenticate on this platform is with a token, therefore it is the only authentication method supported right now.
To add an authentication method, you can simply do:
<AuthenticationMethods>
    <RepositoryToken Repository="someUrl" Token="myToken" />
</AuthenticationMethods>
General Information About Files
Paths In Uplift Are Cross-Platform
Uplift stores paths in Unix format for cross-platformability reasons.
Uplift paths are most often relative:
Upfile.xml
<EditorPluginPath Location="Assets/Editor/Plugins" />
Upbring.xml
<Install xsi:type="InstallSpecPath" Type="Root" Path="UPackages/wwtk.persistence~1.0.0" />
settings.xml
<FileRepository Path="/Users/lacostej/UPackages/" />
In some places, you will need an absolute path. In this case you might need to make the path like this:
settings.xml
<FileRepository Path="/Users/lacostej/UPackages/" />

<FileRepository Path="C:/Users/Paul/Documents/Work/WWTK/WWTK/Development/Software/UPackages/WWTK" />
Supported Repositories Types
Caveats of using Uplift
Using binary (.dll) vs source code
When using binary:
- When upgrading, you have to restart Unity 3D before new version take effect
- For security reason, it’s best for you to actually compile binary by yourself (yet, we promise we will take the most precautions to make binary safe for you)
When using source code:
- If you have any errors in your code Uplift won’t be runnable/reachable from menu
- If you have any unfulfilled dependencies Uplift won’t be runnable/reachable from menu
- Unless you take care of the staging, Unity will be pre-compiled every time with your software.
Version control and package tracking
When using source control, Uplift does its best effort to hide the installed packages from your source control (see Uplift and version control).
Yet, if you do operations on the file system level, such as switching branch while Uplift isn’t running, you might end up in a situation where your source control sees the package files you do not want to check in. To avoid that, you would have to let Uplift update your project source control again.
Let’s take a look at a practical example using Git:
- I work on a project on branch
masterwith a dependency on packageMyCoolPackageversion1.2.8. - I create a branch
update_MyCoolPackage, so I can update it and make sure I can use the updated version. - I update my package to version
`1.3.0on branchupdate_MyCoolPackage - I close Unity if it was open
- I checkout
master - In this specific scenario, it can look like there is an issue, because if I run
git status,Assets/UPackages(or whatever install destination) is marked as untracked, as it will containAssets/UPackages/MyCoolPackage~1.3.0.
What is the issue there? Because we ignore files from version control, git (or your version control software) does not handle your packages. Therefore, it doesn’t know how to deal with them when switching branches, and will not put the correct version of the package in your project.
Thankfully, Uplift knows how to handle that. If you reopen Unity, Uplift will automatically install the last recorded state of the dependencies (see Lockfile overview (Upfile.lock)) therefore restoring the correct state.
In conclusion, when switching branches in version control, it is good practice to reopen Unity, or
to force installation from lockfile Tools > Uplift > Debug > Install from lockfile.
License & Copyright & Authors
Current Uplift Copyright is “2017-2018 WeWantToKnow AS”
Current Uplift license is “MIT”
Current list of Authors and Contributors is:
- Przemysław Kamiński, Entropy^1 (designer and lead developper)
- Paul Niezborala, for WeWantToKnow
- Jérôme Lacoste, for WeWantToKnow